1. how to share data b/w components
2. what is entry components
3. DI injection in angular
4. route guards in angular
5. component life cycle in angular
6. how to inject service in angular
7. what is role of Serivces in angular
8. diff b/w inject and injectable
9. diff b/w ModelChange and ngonChange
10. diff b/w promise and obserable
11. advantages of rxjs
12. what is ngContainer, ngContent
13. how to communicate b/w two sibilings components
14. content projection in angualr
15. diff b/w viewChild and viewContentChild
16. diff b/w jit and aot
17. diff b/w angular and react
18. clouser adv. and disadv. in javascript
19. dynamic components in angualr
20. memory leakages in angualr & javascript
21. angular architecture
22. BehaviorSubjet in rxjs
23. how to create custom directives in angular
24. diff b/w hostlistner and hostbinding in angualr
25. how to create custom pipes in angualr
26. diff b/w reactive forms and modal forms in angualr
27. how angular will bootstrap form beggining
28. what are the new features in angular4
29. how do setup autorization in angualr
30. lazyloading in angular
31. how do check angular app perfomance
32. adv. of AOT compiling
33. can we use ngFor and ngFor same element
34. two way data binding in angular
35. how do setup default routing in angular
36. how do setup angular project
37. how to create component in specific folder
38. how to write unit test cases for angular
39. what is testbed in angualr
40. how do mock your service in angular
React has grown into one of the most popular tools found in a web developer’s library. Get yourself a selection of essential techniques that will improve your code output.
01. Higher-order components
Components often share functionality with each other, such as logging or network requests. These can become difficult to maintain as the number using this logic increases. Developers are encouraged to abstract shared code and include it where necessary.
In a regular JavaScript application, the concept of a higher-order function is one way to approach it. In short, they are functions that take other functions as arguments and impart behaviours onto them. Array methods such as map and filter are examples of these.
Higher-order components (HOCs) are React’s way of achieving the same thing. They are components that impart behaviour onto a passed component.
In this example here, the function returns a new wrapped component, which renders the original one that was passed in alongside any props. HOCs are regular components and can do anything they can, such as passing in their own props and hooking into lifecycle callbacks. The function then wraps the original on export. By using HOCs, it makes commonly used chunks of code easier to maintain and test. When specific functionality is required, they are easy to drop in, safe in the knowledge that it will behave as expected.
02. Container and presentational components
For complex UIs such as a calendar, it's acceptable to put a container within a presentational component, so long as their behaviours remain separate
It is always important to keep a separation of concerns when developing different parts of an application. Where possible, keep the methods of fetching data away from how it is displayed. In React, a similar concept is employed when it comes to container and presentational components.
Here, products are fetched by an external method inside the container, held within its own store and then passed as props to the presentational component Products that displays them.
The container component does not know how to display the information, it only knows how to fetch and adjust it. Likewise, the presentational component does not know where the data came from. The functionality of either component can change without affecting the other.
There may be another section of an application – or a separate application entirely – that can make use of the same presentational component. By having it work solely on props, each part of the application would only need to create its own container around it.
This approach also makes things easier to unit test. The container tests only need to worry about the state being set, while the presentational component can be passed static props to achieve a predictable outcome.
03. Error boundaries
No matter how well a project is put together, errors will still find a way in. These can happen in very specific circumstances, be hard to diagnose and leave the application in an unstable state – an absolute nightmare for both users and developers.
React v16 was released back in September 2017. As part of that update, any unhandled errors would now unmount the entire application. To counter this, the concept of error boundaries was introduced. When an error occurs within a component, it will bubble up through its parents until it either hits the root of the application where it will unmount, or finds a component that will handle the error. The idea of the error boundary is a generic component that takes care of the errors for its children.
By hooking into a new lifecycle method, the error can be stored in state and replace the child contents. This effectively ring-fences this branch of the application off from the rest.
The boundaries work like try/catch blocks. They can be nested inside one another without issue, but any errors that occur within them will be caught by the next boundary up. It's best they are kept as simple as possible.
04. Portals
The contents of the portal appear inside the original component within React's DevTools
There are times where a component needs to break out of its parent to be elsewhere in the DOM. Modal windows, for example, belong in the top level of the page in order to avoid issues with z-index and positioning.
Portals are also part in v16, which enables React to render components into DOM nodes completely separate from the rest of the application. The contents will keep its place in React’s structure, but will render elsewhere. This means any event that gets triggered inside the portal will bubble up through the parent in React, rather than into the portal container element itself.
By creating a dedicated component, the portal can be returned by the render function. When content needs to be displayed, it can be wrapped in this component and then displayed in the other element.
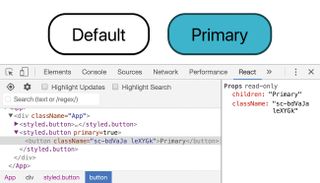
05. CSS with styled-components
Components are given a randomised className to match with the style, which unfortunately can make restyling within DevTools more difficult
Styling an application with reusable components can lead to issues with clashing class names. Conventions such as BEM help mitigate the issue, but they aim to treat the symptoms rather than the problem.
It is possible for components to take charge of their own styles. This means they have a way of adjusting visuals on the fly without the need for either inline styles or class toggles. One such solution is styled-components, which uses JavaScript to its advantage.
As the name suggests, rather than creating classNames it creates entirely new ready-styled components. The system makes use of ES2015 tagged template literals, which can accept regular CSS and apply that to the requested element.
By using a placeholder, the style can be altered dynamically. In this example, the button background changes depending if the button is passed a primary prop. Any expression can be used here to calculate the style required.
The created component can be used just like any other and any props will be passed through. Custom components can also be styled the same way by using styled(ComponentName) instead.
06. Using React-specific linting
Code editors such as Visual Studio Code can integrate with linters and provide users with real-time feedback as components get written
One of the best ways to keep code clean is to use a linter tool. They define a set of rules the code should follow and will highlight anywhere it fails. By ensuring all code passes these rules before merging into the codebase, projects stay maintainable and code quality increases.
ESLint is a popular linter for various JavaScript projects. There are plugins available that analyse specific code styles. One of the most common for React is an npm package called eslint-plugin-react.
By default, it will check a number of best practices, with rules checking things from keys in iterators to a complete set of prop types. More options can be enabled on a per-project basis by updating the .eslintrc config file.
Another popular plugin is eslint-plugin-jsx-a11y, which will help fix common issues with accessibility. As JSX offers slightly different syntax to regular HTML, issues with alt text and tabindex, for example, will not be picked up by regular plugins. It will also pick up React-specific issues, such as assigning aria props with different syntax.
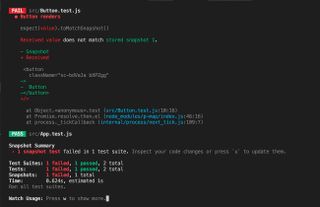
07. Snapshot testing with Jest
Jest will show exactly what has changed between the two snapshots, which can help identify intentional changes from accidental
Although having full test coverage has obvious benefits, it does come at a cost. When writing lots of small components, the tests can take longer to code than the component itself. Most of the time, it is only actually necessary to check that nothing has changed.
Jest is a testing framework created by Facebook. One of its unique features enables developers to capture the view of a component at one point in time and compare it against any changes in the future. The changes – intentional or not – will be flagged for either acceptance or rejection. Tests become fast, predictable and simple to debug when it is easy to see exactly what changed.
When the test first runs, Jest will convert the view to JSON and store that in a special directory that can be committed to source control. When it next runs, it checks the file and will flag up any differences. If that change was a deliberate one, the snapshot is replaced and the test passes. Find out more about Jest and snapshot testing.
08. Code splitting
As with any single page application, everything gets bundled into one file that can quickly bloom in size if it does not get kept in check. Tools such as Webpack can help split this bundle up into more manageable chunks that can then be requested as needed.
As React encourages creating lots of smaller components, there are plenty of opportunities to break up the bundle. The react-loadable package enables a component to define exactly what it needs to render and Webpack can automatically split up its bundle to accommodate this.
Loadable is a HOC that will dynamically import anything the component needs. It takes a few settings, such as what to show while everything loads in, which makes it highly customisable. LoadableButton can then be used as a regular component without issue.
For larger applications with routing, it may be more beneficial to split by route instead of component. Common paths can be pulled in with one request, and can help speed things up. It is important to have a balance between the number of bundles and their overall size, which will change depending on the needs of the application.
More details about react-loadable can be found here.
09. Server rendering
With large applications, users can be looking at a blank screen while the site loads in. Ideally this should be as small as possible. By rendering the initial view on the server, the perceived load time can be reduced, which comes with the added benefit of enabling crawlers to more easily parse content.
React is already equipped to handle rendering on Node servers. A special version of the DOM renderer is available, which follows the same pattern as on the client side.
import ReactServer from 'react-dom/server';
import App from './App';
[...]
ReactServer.renderToString(<App />);
This method will output the regular HTML as a string, which can then be placed inside a page body as part of the server response. On the client side, React detects the pre-rendered content and seamlessly picks up where it left off.
Server rendering in applications that use code splitting, routing or state containers can get more complicated, but it is still possible. Redux, for example, will build a preloaded state object on the server, which can hydrate the client side when creating the store.
10. Internationalization
The Intl API is supported in the latest versions of most browsers, and polyfills are available for others
For global websites, internationalization (i18n) is vital to engage local audiences. For client-side libraries like React, the only option used to be to serve slow, bulky libraries to handle things like translation and number formatting. More recently, the native Intl API has been made available in browsers to avoid the heavy download cost.
A library by the Yahoo team called React Intl helps bring this new API to React projects. A special set of components automatically translate strings and format numbers, dates and currency. It forms part of its collection of i18n tools called FormatJS.
Each component takes props that mirror the settings available to the Intl API. By supplying the required format of the date, the API can use what it knows about the locale of the browser to compute a string. Any time any of these props change, the string updates automatically.
<FormattedMessage
    id='homepage.greeting'
    description='Main greeting for the homepage'
    defaultMessage='Welcome!'
/>
String translations require adding an appropriate translation to the messagesprop to the provider at the root of the application, but which can be used throughout the application. The library detects the ID and replaces the content as necessary.